
Create your First Recipe
The secret to stunning SOOC JPEGs

✨ A Quick Pause in the Fujifilm X Series: Understanding the Still Menus
While we take a short break from our deep dive into the X-T5 menus, I wanted to share a favorite film recipe of mine.
📅 The series will be back in a couple of days.
One of the key advantages of Fujifilm cameras like the X-T5 lies in the powerful flexibility of their built-in Film Simulations. These are fantastic out of the box—but the real magic happens when you fine-tune them to craft your own custom recipes.
With custom settings, you can achieve a cinematic or film-inspired look straight out of camera, no expensive film development or time-consuming RAW editing needed.
This guide walks you through your first recipe step by step, ending with a flexible and film-inspired profile: Classic Portra.
🛠️ Step-by-Step: Creating a Custom Recipe on the X-T5
Here’s how to quickly create a Fuji recipe.
🔍 Step 1: Access the Image Quality Settings
Set the STILL/MOVIE dial to STILL.
Press the MENU/OK button.
Navigate to IMAGE QUALITY SETTING menu.
🎞️ Step 2: Define Your Base Settings
Inside the IMAGE QUALITY SETTING menu, adjust:
Film Simulation— Film look baseDynamic Range— Highlight controlTone Curve(Highlights & Shadows) — Contrast tuningColor— Overall saturationSharpness— Edge definitionHigh ISO NR— Noise reductionGrain Effect(Size & Strength) — Film textureColor Chrome Effect— Deeper midtonesColor Chrome FX Blue— Blue tone controlWhite Balance— Temperature & tint
These form the core of your film look. Don’t worry about perfection yet—you’ll tweak further as you shoot.
💾 Step 3: Save to a Custom Slot
Once you’re satisfied with your adjustments:
Go to EDIT/SAVE CUSTOM SETTING.
Choose a slot (e.g., C1).
Confirm with MENU/OK.
🏷️ Step 4: Name and Activate Your Recipe
In EDIT/SAVE CUSTOM SETTING, select your slot.
Choose EDIT CUSTOM NAME and rename it (e.g.,
Classic Portra).Use SELECT CUSTOM SETTING to activate it.
💡 Pro Tip: Assign SELECT CUSTOM SETTING to a custom button (like Fn4) or include it in your Quick Menu for fast access.
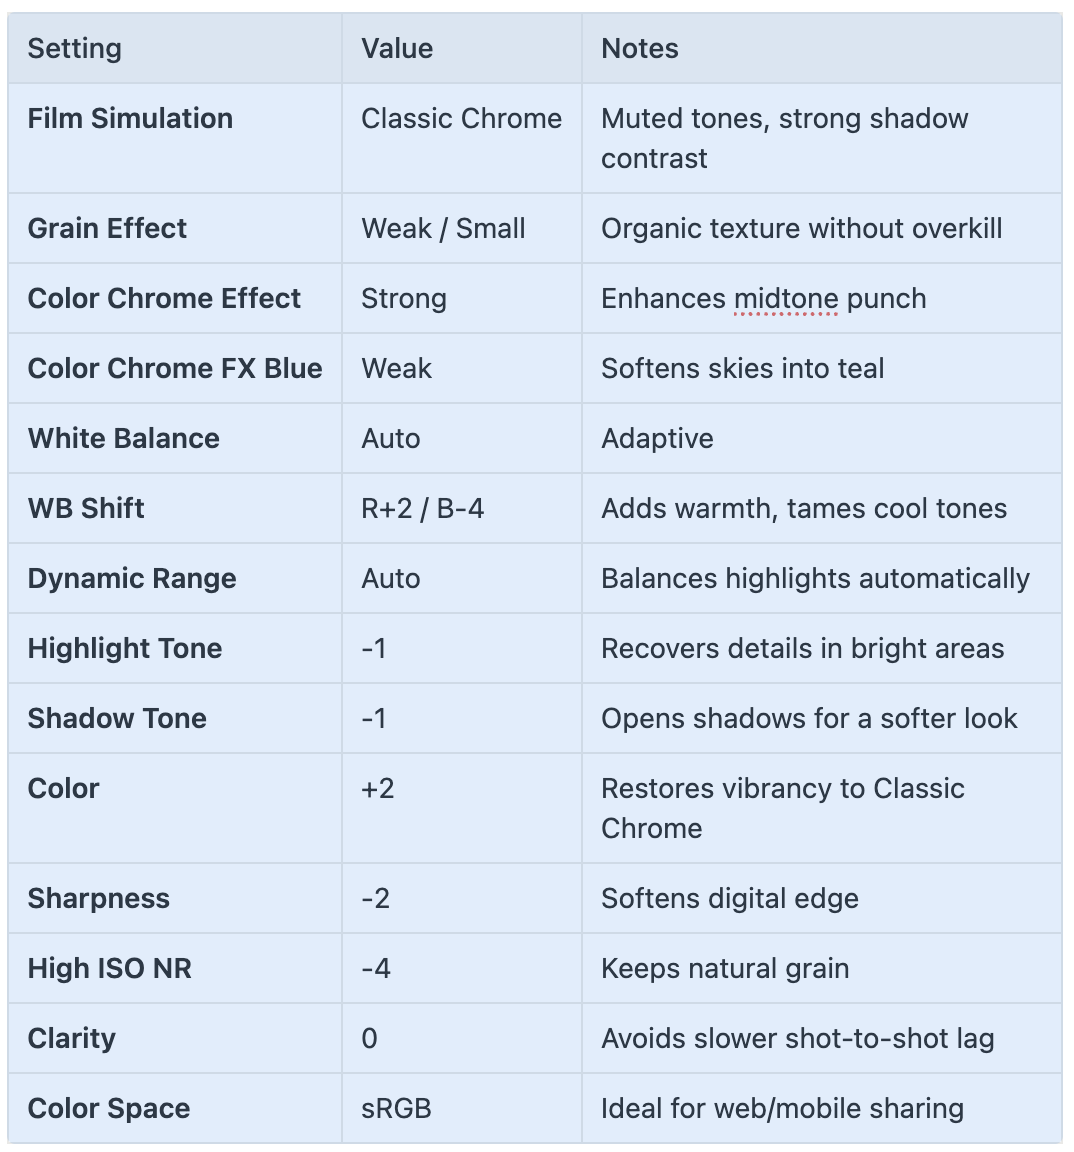
🎨 Your Sample Recipe: “Classic Portra”
Inspired by Kodak Portra, this recipe creates soft tones, warm light, and rich but natural color. It’s an excellent all-rounder.
🆚 Before & After: What a Film Recipe Really Does
To illustrate the power of custom recipes, here’s a direct comparison: one image shot with the default X-T5 settings (Provia/Standard), and the same scene captured using the “Classic Portra” recipe.
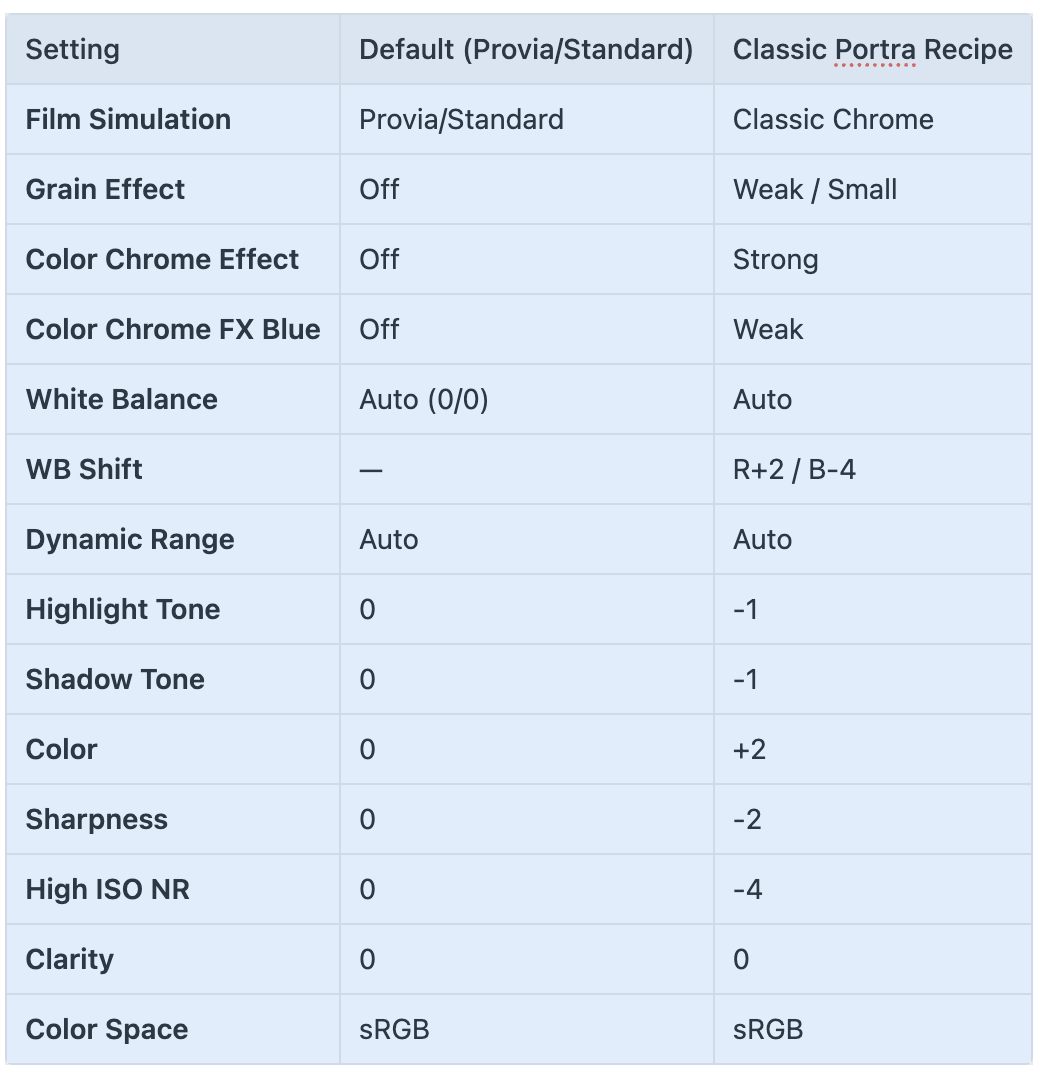
🆚 This comparison shows how a few subtle adjustments can dramatically transform a digital image into something warmer, softer, and more film-like—straight out of camera.


🎞️ Final Thoughts: Turn Your X-T5 Into a Digital Film Scanner
Creating recipes is like setting your X-T5 to behave like a personalized film scanner. By understanding how tone curves, color shifts, and Film Simulations interact, you unlock the full potential of Fujifilm JPEGs.
Once you’ve mastered this first recipe, you’re ready to experiment with others: black & white, cinematic blue-hour, vintage Kodachrome, and more.
🔓 The possibilities are endless—and the results are immediate.
📘 Want to Go Deeper?
Download the Complete X-Series Recipes Guide I shared three months ago in my newsletter The Unofficial Fuji X Series User’s Guide. It’s packed with detailed recipes, creative tips, and settings breakdowns for getting the most out of your JPEGs.