
Fujifilm X Series: Understanding Still Menu Image Quality Setting (Post1/3)
Mastering JPEG quality, film simulations, and Fujifilm’s signature color science

📖 The Image Quality Setting menu is one of the most comprehensive in the Fujifilm X Series — so rich, in fact, that it will be covered across three separate posts.
👉 This is Part 1 of 3, and it covers the following settings:
Image Size
Image Quality
Raw Recording
Select JPEG/HEIF
Film Simulation
Monochromatic Color
Grain Effect
Color Chrome Effect
The Image Quality Setting menu is where you define the overall “look and structure” of your JPEG and HEIF files. It’s one of the most frequently used menus for photographers who shoot in-camera JPEGs, and it also affects previews and histograms even when shooting RAW.
This menu contains 26 items that influence everything from file type and resolution to film simulations, white balance, clarity, color rendering, sharpness, and more.
Whether you’re aiming for beautiful straight-out-of-camera JPEGs or want a solid foundation before RAW editing, this is the place to start.
Menu overview
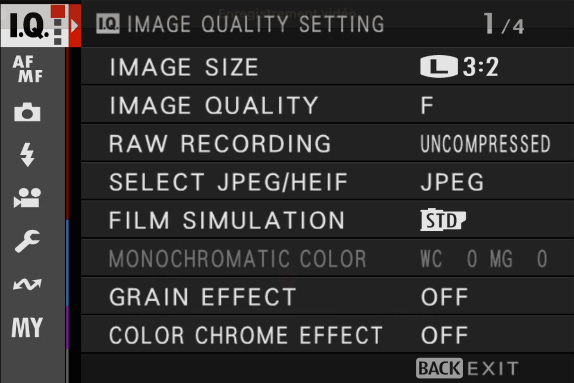
Image Size
📸 What it does
This setting determines the number of pixels and the aspect ratio of the photo saved to your memory card. It applies to JPEG and HEIF files only — RAW files always use the full sensor resolution.
⚙️ Available options
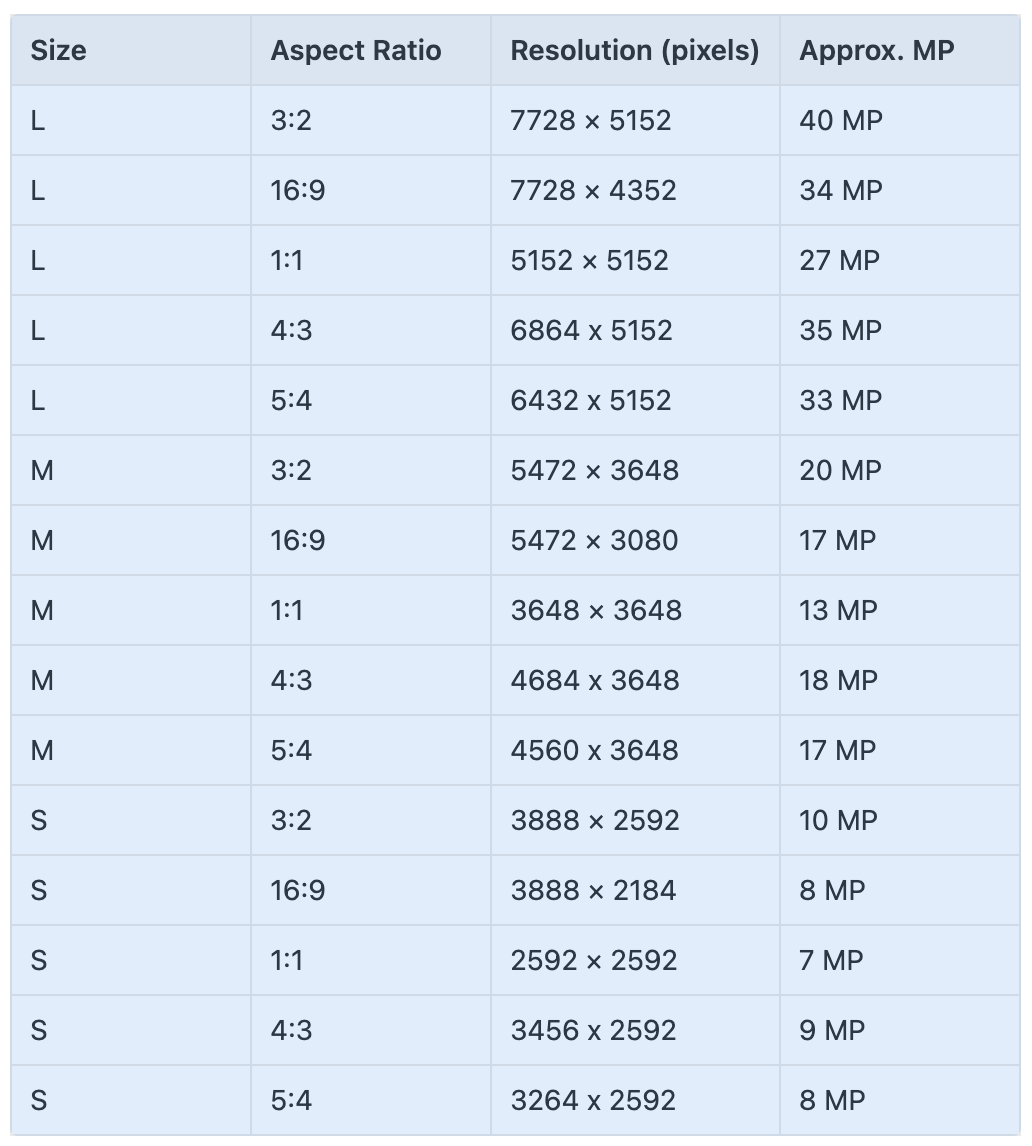
The number next to each size/format option shows how many photos you can store based on your current file type and available card space.
📝 Note: Image Size is grayed out when shooting in RAW-only mode.
🎯 When and why to use it
L (Large): Best for prints, cropping flexibility, or detailed subjects. Always safe if you’re unsure.
M (Medium): Useful when you want to save card space or reduce file transfer sizes without sacrificing too much detail.
S (Small): Ideal for web use, social media, or when image size isn’t critical (e.g. snapshots, quick sharing).
🛠 Recommended setting
For most users: L / 3:2 — it gives you the full 40MP resolution of the X-T5.
If you shoot only for online use or want smaller files: M / 3:2 is a good compromise.
Avoid downsizing to S unless you have a specific reason.
💡 Tips
Shooting RAW+JPEG? Set JPEG to M or S to save space and speed up workflow while keeping your RAWs full size.
If you’re composing for Instagram or video thumbnails, try 1:1 or 16:9 to preview framing in-camera.
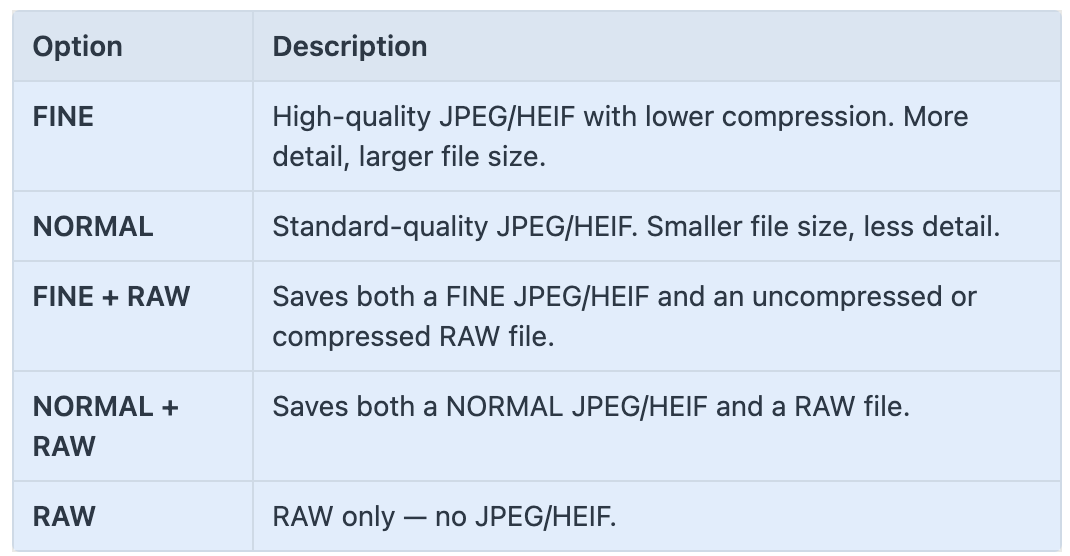
Image Quality
📸 What it does
This setting defines the file type and compression level used when saving still images. You can choose between high- or standard-quality JPEGs or HEIFs, or record RAW files alone or in combination with JPEGs or HEIFs.
It directly affects image quality, file size, and the flexibility you have for post-processing.
📝 Note: This setting does not affect resolution or aspect ratio. It only applies to the type and quality of the saved image.
⚙️ Available options
💡 The choice between JPEG and HEIF formats is made in the Select JPEG/HEIF menu.
💡 RAW compression settings (Uncompressed, Lossless Compressed, etc.) are configured separately in the RAW Recording menu.
🎯 When and why to use it
FINE: Ideal if you’re using JPEGs or HEIF straight out of camera and want maximum quality.
NORMAL: Useful when storage space is limited or for casual shooting.
+ RAW options: Best for photographers who want both in-camera previews and full editing flexibility.
RAW: For full control over image processing and maximum quality in post.
🛠 Recommended setting
For most users: FINE + RAW — best balance between immediacy and flexibility.
For quick sharing or web use: FINE or NORMAL if you don’t need RAW.
For editing-heavy workflows: RAW only, to save space and focus on post-production.
💡 Tips
If you’re shooting RAW + JPEG or HEIF, the JPEG/HEIF preview reflects the selected film simulation — even if you later process the RAW differently.
NORMAL + RAW can help save card space when shooting in large volumes, with only a slight drop in JPEG quality.
Use FINE + RAW if you’re experimenting with film simulations but still want RAW backups for flexibility.
Raw Recording
📸 What it does
Keep reading with a 7-day free trial
Subscribe to The Unofficial Fuji X Series User's Guide (EN) to keep reading this post and get 7 days of free access to the full post archives.